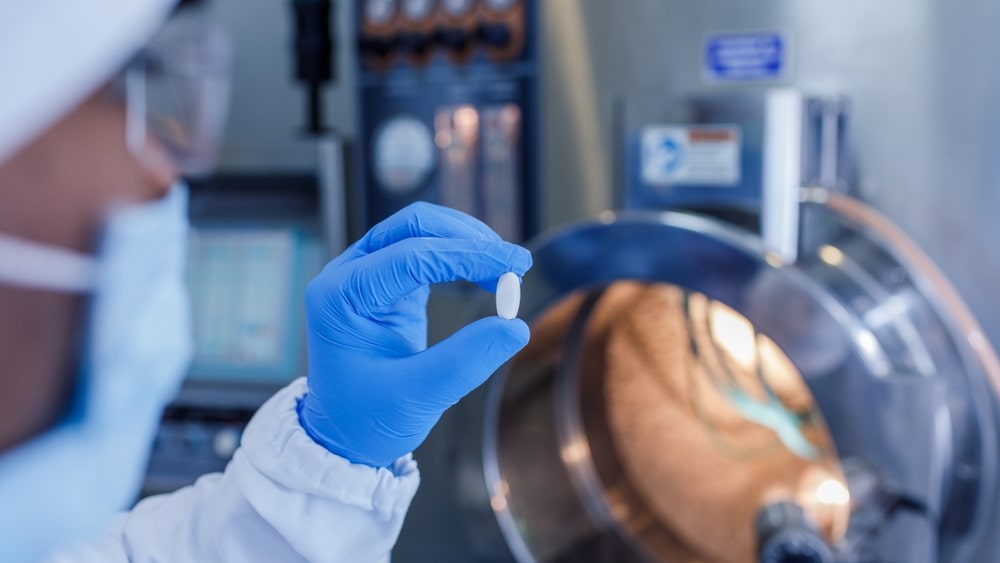
Along with safety and efficacy, quality is one of the most important criteria to assess the fitness of a medicinal product for use by the patient. This parameter is not something that can be achieved by itself, without any effort. While the earlier concept was to test products for quality, the pharmaceutical industry has now moved on to building quality into products right from the design stage itself. However, quality control (QC) still plays a vital role in giving a high degree of assurance that products are meeting their specifications.
Table of Contents
Definition of the quality control
According to WHO
The World Health Organization (WHO) defines the term quality control as, “The sum of all procedures undertaken to ensure the identity and purity of a particular pharmaceutical. Such procedures may range from the performance of simple chemical experiments which determine the identity and screening for the presence of a particular pharmaceutical substance (thin layer chromatography, infrared spectroscopy, etc.), to more complicated requirements of pharmacopoeial monographs.”
Schedule M
Schedule M of the Indian Drugs and Cosmetics Act and Rules defines a Quality Control system as follows:
“Quality Control shall be concerned with sampling, specifications, testing, documentation, release procedures which ensure that the necessary and relevant tests are actually carried and that the materials are not released for use, nor products released for sale or supply until their quality has been judged to be satisfactory. It is not confined to laboratory operations but shall be involved in all decisions concerning the quality of the product. It shall be ensured that all quality control arrangements are effectively and reliably carried out the department as a whole shall have other duties such as to establish evaluate, validate and implement all Quality Control Procedures and methods.”
Scope of quality control
Pharmaceutical QC aims at investigating manufactured drug products according to compendial specifications and standards to monitor that they are of the required quality. QC is concerned with setting up specifications, drawing samples, testing them, and generating documentation related to the tests and their reports. Quality Control also evaluates the analysis reports and ensures that no material is released for use or for supply or sale until it meets the necessary quality requirements and pre-determined specifications. The scope of Quality Control is not limited to mere laboratory work; this department is involved in all situations that involve the quality of the product.
Organization of Quality Control
Drug manufacturers are required to set up their own Quality Control labs and employ staff with the necessary qualifications and training to perform the necessary tests. The department must have adequate space to perform all the analyses, store data related to them, and also store reference samples from each batch of products shipped from the company.
Most quality control laboratories are divided into different types of testing – chemical, instrumental, biological, and microbiological.
One of the fundamental requirements for the Quality Control department is that it must be independent of all the other departments. The Quality Control Head must report directly to the topmost authority, and not to the Production Head.
Responsibilities of QC
Responsibilities of Quality Control are as follows :
- Preparing specifications for all raw materials, packing materials, finished products, intermediates and solvents, and reagents used in analyses.
- Inspecting, sampling, and testing of all starting materials including packaging materials, intermediate and finished products as per procedures defined in the Standard Operating Procedures (SOPs).
- Performing stability testing to assess product stability.
- Monitoring environmental conditions are met as per current Good Manufacturing Practices (cGMP) requirements.
- Preparing analysis reports for the tested samples, and recording and investigating any results that are Out Of Specification (OOS).
- Approving product batches for sale after ensuring it meets the quality, safety, and efficacy standards prescribed.
- Calibration of all laboratory instruments and devices used in the testing.
- Validation of analytical methods used in the testing.
- Retaining reference samples from each batch of products released to the market.
- Reviewing the batch manufacturing and packing records and assessing the test reports to ensure products are of the desired quality and have been properly packed and labeled.
- Participating in any investigation that follows market complaints about the quality of a product.
Sampling
Quality Control personnel must be authorized to enter the stores and production areas for the sampling of materials, intermediates, and final products. The samples must be drawn in keeping with approved written procedures in a way to be truly representative of the materials. Care must be taken during sampling to avoid contamination of the containers, and also the mix-up of materials sampled. This is achieved by using clean and sterilized (if necessary) sampling equipment.
The containers from which samples have been drawn must be resealed correctly after sampling. Such containers must be labeled with details of the name of the material, batch or lot number, sampling date, and signature of the sampler.
Testing and Analysis
The analysis must be performed on the samples drawn, and results informed to the stores and production heads. Containers must duly be affixed with “Approved” or “Rejected” labels as the case may be; rejected material must be removed to a separate area with entry restricted to authorized persons only.
Product Assessment
All batch processing records must be reviewed for conditions under which production was done and results of testing of starting material, in-process and finished products must be studied. Compliance of final product to specifications and presence of complete documentation must be confirmed. After verifying all these, the assessment records are signed by the Production Head and the Quality Control Head, and only then is the product released for distribution and sale.
Reference samples/Retained samples
Samples must be retained from every batch of products released to the market. The quantity of these retained samples must be at least double the quantity required to conduct all tests. They must be retained in their final packs for a duration of 3 months after their expiry date. If any market complaints are received following supply and sale, the reference samples must be examined and analyzed to determine the veracity of the complaint.
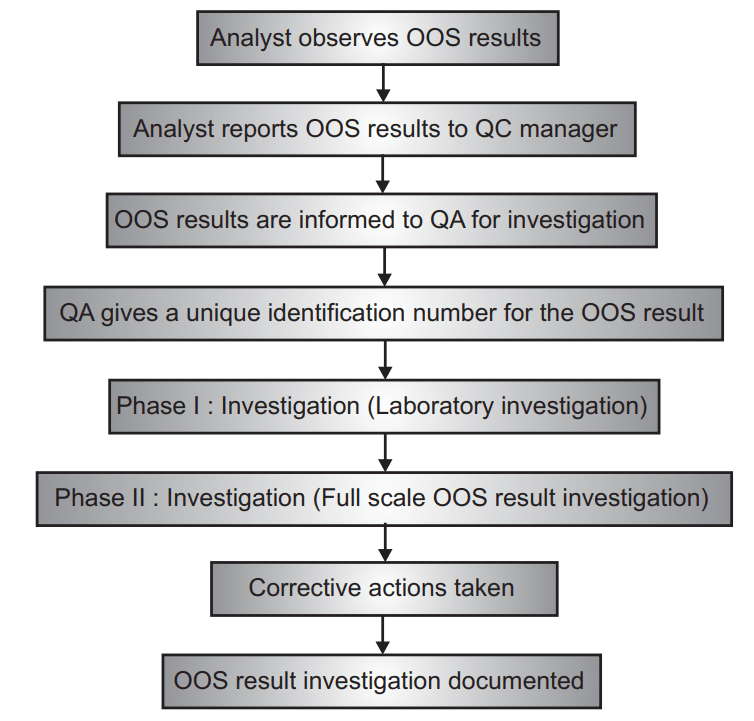
Out of specification (OOS) results
According to the United States Food and Drug Administration (USFDA), OOS results are defined as, “All test results that fall outside the specifications or acceptance criteria established in drug applications, drug master files (DMFs), official compendia, or by the manufacturer. The term also applies to all in-process laboratory tests that are outside of established specifications.”
OOS results indicate a loss of control over either the manufacturing or the analytical process or both. This can result in defective products being sent out, subsequent market complaints or product recalls, and even a threat to the life of the patients. So, it is vital to investigate OOS results and identify and address the root causes responsible for the OOS result.
There must be written and approved procedures to investigate any OOS results and these must be followed. OOS result investigation generally proceeds in two phases.
Phase I: Laboratory Investigation
Here, the objective is to identify the cause of the OOS result. It may arise from an aberration in either the analytical process or the manufacturing process. If the OOS result causes rejection of a batch of products, it is still necessary to investigate the cause and check if there may have been an impact on any other batch of the same or different products.
In this phase, the accuracy of the data collected by the laboratory is first assessed using the same samples, reagents, and standards that have been previously used. This helps to identify if any lab error or instrumental error or analyst error caused the OOS result. Common causes of the error include faulty dilutions, incorrect calculations, equipment malfunction, and error in the analytical method adopted.
If none of these are identified as the cause, the investigation moves to the second phase which is a full-scale OOS investigation.
Phase II: Full-scale OOS Investigation
In this phase, a multi-department investigation committee is formed with representatives from Quality Control, Quality assurance, Production, Stores, and Engineering. The production process is reviewed and if necessary, additional laboratory analysis is performed. Sampling procedures, production processes, storage conditions, facility environment are all reviewed to identify the cause of the OOS result. If the cause is successfully identified, the investigation is terminated, and the affected product must be rejected. Other batches of products already distributed, but which may have been affected by the OOS, must also be investigated.
In some cases, the OOS result investigation may be inconclusive – that is, either the OOS result is not confirmed or the cause of the OOS result is not detected. In such situations, the Quality Control unit may decide to release the batch if the following conditions all exist:
- Subsequent re-test results lie within specifications, and
- No laboratory error is identified, and
- No process aberrations have been revealed by the review, and
- Results from the batch’s in-process tests, dissolution, content uniformity, and other important tests match the passing re-test results
- The process is found to be robust, and other batches have not been affected. All findings in all stages of the investigation must be clearly documented and stored.
Documentation of OOS result investigation:
Information to be documented for every OOS result investigation:
- Reason for investigation.
- Details of the OOS result.
- Phase I Laboratory investigation details and findings.
- Summary of Phase II analysis performed.
- Root cause identified as actual/probable cause of the OOS result.
- Description of corrective actions taken following the OOS result.
- Result from document review of previous batches to check if a similar problem has occurred before.
The flow of events in case of OOS result:
Drug packing
Merely producing a good quality drug product is not enough; it must be packed in a system that ensures the drug retains its activity, efficacy, and safety. The packaging used must not have an adverse impact on the drug product; at the same time, it is also important to ensure that the product does not cause damage to the packaging.
Function of Packing
The packing material used to deliver a product has several functions:
- Containment of product is the basic function. The packaging must be effective enough to hold the product without leaking and not cause diffusion of the product.
- The packaging gives protection against external environmental conditions that may affect the strength, identity, purity, and quality of the product.
- It helps to identify the product by name and provides all necessary information about the product.
- Packaging permits the easy use or administration of the drug product.
Classification of pharmaceutical packing
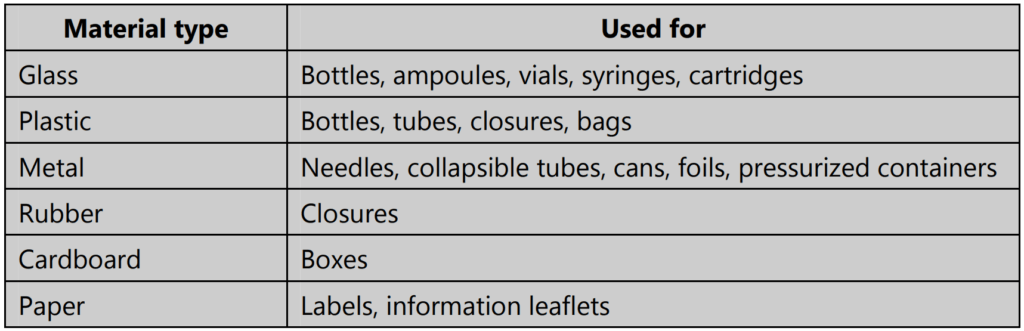
Packaging materials may be classified into three categories:
- Primary packaging first covers the product and holds it – the parts that come into direct contact with the product. Examples – bottle, ampoule, ointment tube, etc.
- Secondary packaging surrounds the primary packaging. Examples – box, carton, injection tray, etc.
- Tertiary packaging that is used for transportation in bulk. Examples – barrel, crate, etc.
Quality control of packing materials
The physical and chemical characteristics of packaging material are crucial in determining if it will be able to provide adequate containment and protection to the drug product. Packaging material must be designed keeping in mind the nature of the drug product. Quality Control testing of packaging materials is to be done when the materials are received from the vendor; during the packing process and at the end of packing too, samples are drawn to test the completeness and integrity of the final pack.
Parameters Tested
Packaging materials are tested for their appearance, dimensions, compatibility, chemical composition, and customer usability. Tests are performed to check the suitability of:
- Material of primary packaging – chemical tests, mechanical tests, and environmental tests.
- Final pack in secondary packaging – mechanical tests and environmental tests.
Some Important Chemical Tests:
Tests for glass containers:
- Water attack test
- Hydrolytic resistance test
- Powdered glass test
- Light transmission test
- Arsenic test
- Internal bursting pressure test
- Thermal shock test
- Annealing test
- Vertical load test
- Autoclaving
Ampoule sealing tests:
- Appearance
- Quality of seal
- Sealed ampoule length
- Headspace oxygen
Plastic containers testing:
- Physicochemical tests on aqueous extracts
- Heavy metals test
- Non-volatile residue
- Biological in-vivo test
- Hemolytic effect of aqueous extracts
- Acute systemic toxicity
Rubber closure testing:
- Self sealability test
- Fragmentation test
Collapsible tubes testing:
- Leakage test
- Lacquer compatibility test
- Lacquer curing test
Strip and blister packs testing: Leakage test
Paper and board tests:
- Paper and board density
- Moisture content
- Air permeability
- Folding endurance
- Grammage
- Tear strength
- Tensile strength
- Burst strength
- Puncture resistance
- Cobb test for water absorbance
- Creasability
- Stiffness
- Rub resistance
- Ink absorbency
- Brightness
- Roughness/smoothness
Tests on cartons:
- Compression
- Coefficient of friction
- Carton opening force
- Crease stiffness
- Joint shear strength
Tests on containers as per Indian pharmacopeia
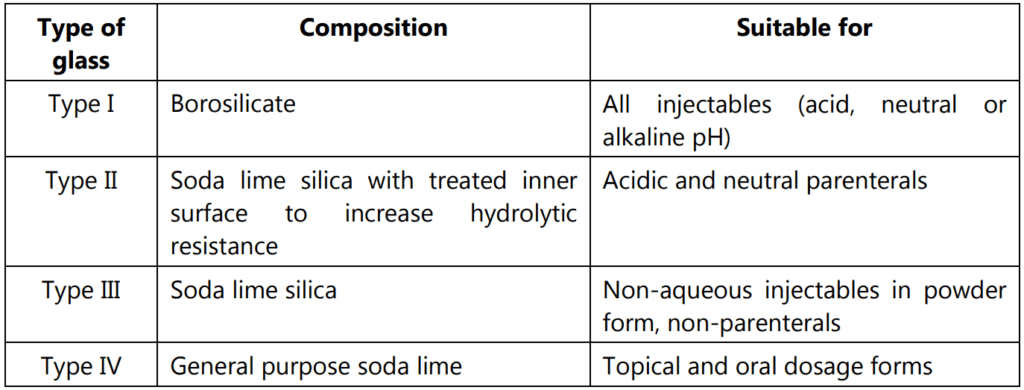
Tests on Glass Containers
Hydrolytic Resistance Test
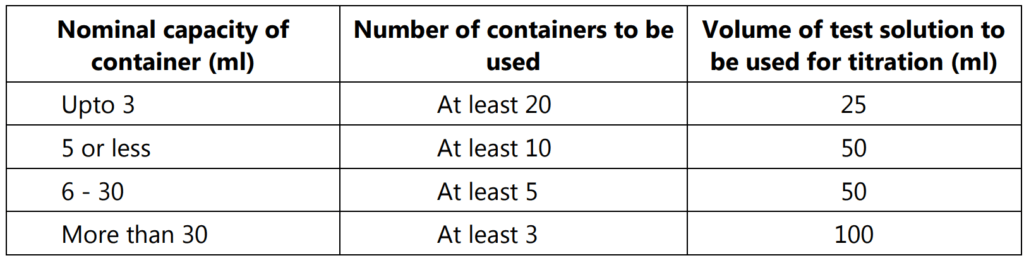
The tests to be done for defining the type of glass are given in Table 1.1

Test 1
Carry out the determination on the unused containers. The number of containers to be examined and the volumes of the test solution to be used are given in Table 1.2.
Remove any debris or dust from the containers. Rinse each container at least twice with water at room temperature. Just before the test, rinse each container with freshly prepared distilled water and allow it to drain. Complete the cleaning procedure from the first rinsing in not less than 20 minutes and not more than 25 minutes. Fill the containers to the brim with freshly prepared distilled water, empty them and determine the average overflow volume.
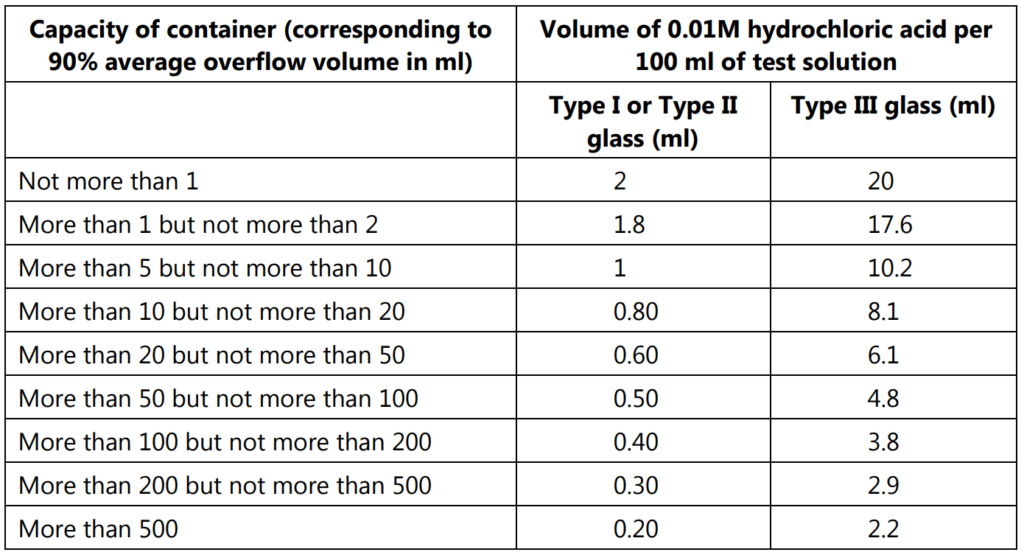
Heat closed ampoules on a water bath or in an air oven at about 50°C. Fill the ampoules with freshly prepared distilled water to the maximum volume compatible with sealing them by fusion of the glass, and seal them. Fill bottles or vials to 90% of their calculated overflow volume and cover them with borosilicate glass dishes or aluminum foil previously rinsed with freshly prepared distilled water. Place the containers in an autoclave containing water so that they remain clear of the water. Close the autoclave, displace the air by the passage of steam for 10 minutes, raise the temperature from 100 to 121°C over 20 minutes, maintain a temperature of 121°C for 60 minutes and reduce the temperature from 121°C to 100°C over 40 minutes, venting to prevent a vacuum. Remove the containers from the autoclave and cool them in a bath of running tap water. Carry out the following titration within 1 hour of removing the containers from the autoclave. Combine the liquids from the containers under examination, measure the volume of test solution specified in Table 10.2 into a conical flask and add 0.15 ml of methyl red solution for every 50 ml of liquid. Titrate with 0.01 M hydrochloric acid taking as the endpoint the color obtained by repeating the operation using the same volume of freshly prepared distilled water. The difference between the preparations represents the volume of 0.01M hydrochloric acid required by the test solution. Calculate the volume of 0.01M hydrochloric acid required for every 100 ml of test solution if necessary. The result is not greater than the value stated in Table 1.3.
Test 2:
Examine the number of containers indicated in Table 1.2. Rinse the containers twice with water and then fill completely with a 4% v/v solution of hydrofluoric acid and allow to stand at room temperature for 10 minutes. Empty the containers and rinse carefully 5 times with water. Carry out the procedure described under hydrolytic resistance. Compare the results with the limiting values given in Table 10.3. For type I glass, the values obtained with the hydrofluoric acid-treated containers are closely similar to those stated in the table for type I or type II glass. For type II glass, the values obtained with the hydrofluoric acid-treated containers greatly exceed those given in the table for type I or type II glass and are similar to those given for type III glass.
Powdered Glass Test
Rinse thoroughly six or more containers with purified water selected randomly and dry them with a current of clean dry air. Crush the containers into fragments about 25 mm in size. Divide about 100g of the coarsely crushed glass into three approximately equal portions and place one portion in a mortar and crush the glass further by striking 3 or 4 blows with a hammer. Empty the mortar contents into sieve no. 20, sieve no. 40 and sieve no. 50. Repeat the operation into two remaining portions of the glass. Shake the sieve for short time then remove the glass from the sieve. Repeat this crushing and sieving operation. Empty the receiving pan. Transfer the portion retained on the sieve no. 50 which should weigh in excess of 10 g in a closed container and store in a desiccator until used for the test. Spread the specimen on a glazed piece of paper and pass a magnet through it to remove the particles of iron that may introduce during the crushing. Transfer the specimen to a 250 ml conical flask of resistant glass and washed with six 30 ml of acetone. Swirling each for about 30 sec and carefully decanting the acetone. Dry the flask and contents for 20 min at 140°C. Transfer the grains to a weighing bottle and cool in a desiccator. Use the test specimen within 4-8 hrs of drying.
Procedure:
Transfer 10 g of the prepared specimen accurately weighed, to a 250 ml conical flask that has been digested previously with highly purified water in a bath at 90oC for at least 24 hrs or 121oC for one hour. Add 50 ml of high purity water to this flask and to one similarly prepared blank.
Cap all flasks with a borosilicate glass beaker. Place the container in the autoclave and close it securely, leaving the vent hole open. Heat until steam comes out heavily from the vent cock and continue heating for 10 min. Close the vent cock and adjust the temperature to 111°C. Hold the temperature at 121°C for 30 min. Reduce the heat so that the autoclave cools and comes to atmospheric pressure. Detain the water from the flask into a suitably cleaned vessel and wash the residual powdered glass with 4 × 15 ml high purity water. Add the decanted water to the main wash. Add 5 g of methyl red solution and titrate immediately with 0.02 N sulphuric acid. If the volume of the titrating solution is expected to be less than 10 ml, use a micro burette. Record the volume of 0.02 N sulphuric acid used to neutralize the extract from 10g of the specified specimen of glass, corrected for blank. The volume does not exceed indicated in the table for the type of glass concerned.

Arsenic Test
Glass containers for aqueous parenteral preparations should comply with the following test. Carry out the test on ampoules the inner and outer surfaces of which are washed 5 times with freshly distilled water.
Prepare a test solution as described in the test for hydrolytic resistance for an adequate number of containers to produce 50 ml. Pipette 10 ml of the test solution from the combined contents of all the containers into a flask, add 10 ml of nitric acid and evaporate to dryness on a water bath. Dry the residue in an oven at 130°C for 30 minutes. Cool, add to the residue 10 ml of hydrazine molybdate reagent, swirl to dissolve, and heat under reflux on a water bath for 20 minutes. Cool to room temperature. Determine the absorbance of the resulting solution at the maximum at about 840 nm using 10 ml of hydrazine molybdate reagent as the blank. The absorbance of the test solution does not exceed the absorbance obtained by repeating the determination using 0.1 ml of arsenic standard solution (10 ppm As) in place of the test solution (0.1 ppm).
Metal Containers for Eye Ointments
Metal collapsible tubes comply with the following tests for metal particles.
Select a sample of 50 tubes from the lot to be tested and clean each tube by vibration and/or blowing. Fill the tubes with a suitable molten eye ointment base, close the open end of each tube by a double fold and allow the filled tubes to cool overnight at a temperature of 15°C – 20°C. Assemble a metal bacteriological filter with a 4.25 cm filter paper of suitable porosity supported on the suitable perforated plate in place of the standard sintered carbon disc and heat it in a suitable manner to a temperature above the melting range of the base. Remove the caps from the cooling tubes, and apply uniform pressure to the closed end of each tube in turn, in such a manner that the time taken to express as much of the base as possible through each nozzle is not less than 20 seconds. Collect the extruded base from the 50 tubes in the heated filter, applying suction to the stem of the filter in order to draw the molten base through the filter paper. When the entire melted base has been removed, wash the walls of the filter and the filter paper with three successive quantities each of 30 m, of chloroform, allow the filter paper to dry, and immediately mount it between glasses for examination.
Examine the filter paper under oblique lighting with the aid of magnifying glass with a graticule of 1 mm squares, 1 of which is subdivided into 0.2 mm squares and note:
The number of all metal particles is 1 mm in length and longer. The number in the range 0.5 mm to less than 1 mm and the number in the range 0.2 mm to less than 0.5 mm.
Carry out two further examinations with the filter paper in two different positions so that the lighting comes from different directions and calculate the average number of metal particles counted in each of the three ranges specified. Give each metal particle detected on the filter paper, a score as follows and add the scores together.
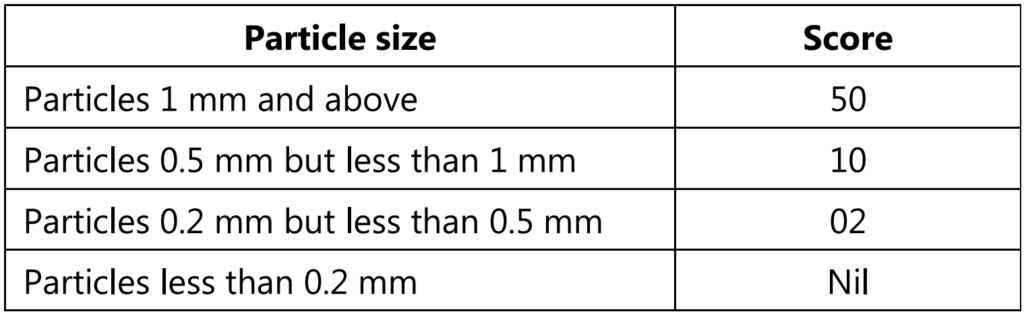
A lot of tubes pass the test if the total score is less than 100 points. If the total score is more than 150 points, the lot fails the test. If the total score is between 100 and 150 inclusive, the test is repeated on a further sample of 50 tubes and the lot passes the test if the sum of the total scores in the two tests is less than 150 points.
Plastic Containers and Closures
For Non-parenteral Preparations
Leakage Test
Fill 10 containers with water, fit with the intended closures and keep them inverted at room temperature for 24 hours. There are no signs of leakage from any container.
Collapsibility Test
This test is applicable to containers that are to be squeezed in order to remove the contents. A container, by collapsing inward during use, yields at least 90% of its nominal contents at the required rate of flow at ambient temperature.
For Oral Liquids
Clarity of Aqueous Extract
Select, unlabeled and unmarked, and non-laminated portions from suitable containers taken at random, sufficient to yield a total area of sample required, taking into account the surface area of both sides. Cut these portions into strips, none of which has a total area of more than 20 cm2. Wash the strips free from extraneous matter by shaking them with at least two separate portions of distilled water for about 30 seconds in each case, then draining off the water thoroughly. Select cut and washed portions of the sample with a total surface area of 1250 cm2, transfer to a flask, previously cleaned with the chromic acid mixture and rinsed with several portions of distilled water and add 250 ml of distilled water. Cover the flask with a beaker and autoclave at 121°C for 30 minutes. Carry out a blank determination using 250 ml of distilled water. Cool and examine the extract. It is colorless and free from turbidity.
Non-volatile Residue
Evaporate 100 ml of the extract obtained in the test for clarity of aqueous extract to dryness and dry to constant weight at 105°C. The residue weighs not more than 12.5 mg.
Water Vapour Permeability
Fill 5 containers with a nominal volume of water and heat seal the bottles with aluminum foil. Weigh accurately each container and allow it to stand for 14 days at the humidity of 60 ± 5% and temperature of 20°C and 25°C. Reweigh the containers. Loss in weight in each container is not more than 0.2%
Leakage Test, Collapsibility Test
Comply with test described under plastic containers for non-parenteral preparations.
For Parenteral Preparations
Solution S: Fill a container to its nominal capacity with water and close it. If possible, use the usual means of closure; otherwise, close using a sheet of pure aluminum. Heat in an autoclave so that a temperature of 121 ± 2°C is reached within 20 to 30 minutes and maintained at this temperature for 30 minutes. If heating at 121°C leads to deterioration of the container, heat at 100°C for 2 hours. Use solution S within 4 hours of preparation.
Blank: Prepare a blank by heating water in a borosilicate flask closed by a sheet of pure aluminum at the temperature and for the time used for the preparation of solution S.
Clarity and Colour of solution S: Solution S is clear and colorless.
Acidity or Alkalinity
To a volume of solution S corresponding to 4% of the nominal capacity of the container, add 0.1 ml of phenolphthalein solution. The solution is colorless. Add 0.4 ml of 0.01 M sodium hydroxide. The solution is pink. Add 0.8 ml of 0.01M hydrochloric acid and 0.1 ml of methyl red solution. The solution is orange-red or red.
Light Absorption
The light absorption in the range of 230 nm to 360 nm of solution S using a blank prepared as described under solution S is not more than 0.20.
Reducing Substances
To 20 ml of solution S, add 1 ml of dilute sulphuric acid and 20 ml of 0.02 M potassium permanganate. Boil for 3 minutes. Cool immediately. Add 1 g of potassium iodide and titrate immediately with 0.01M sodium thiosulphate using 0.25 ml of starch solution as an indicator. Carry out a titration using 20 ml of the blank prepared under light absorption. The difference between the titration volumes is not more than 1.5 ml.
Transparency
Fill the container previously used for the preparation of solution S to its nominal capacity with 1 in 200 dilutions of the standard suspension for a container made from polyethylene or polypropylene. For containers of other materials use 1 in 400 dilutions. The cloudiness of the suspension is perceptible when viewed through the container and compared with a similar container filled with water.
Tests on unlabeled, unprinted, or non-laminated container material include a test for barium, heavy metals, tin, zinc, and residue on the ignition to be performed as per Indian Pharmacopoeia.
Biological Tests
These tests are designed to determine the biological response of animals to plastics and other polymeric material by the injection or instillation of specific extracts from the material under test. Some of the tests performed include:
Systemic Injection Test
To measure the irritation and toxicity caused by the administration of sample orally, on the skin, and by inhalation.
Test animal: Albino Mice Inject each of 5 mice in the test group with sample or blank observe the animals immediately, again after 4 hours, and then at 24, 48, and 72 hours. If none of the animals shows significantly greater biological reactivity than the blank, the sample meets the requirements. If abnormal behavior such as prostration or convulsions occurs or if there is a loss of body weight greater than 2g, the sample does not meet the requirements.
Intracutaneous Test
To measure localized irritation and toxicity when the sample comes into contact with live subdermal tissues. Test animal- Rabbit Administer intracutaneous injection of doses of the sample and the blank. Examine the sites of for any tissue reaction like erythema, edema, neurosis at 24, 48, 72 hours after injection. Limit- the difference between the scores of sample and blank should be lesser than 1.0.
Plastic Containers for Ophthalmic preparatIons
They should comply with the following tests described under plastic containers for non-parenteral preparations.
- Leakage tests
- Collapsibility tests
- Clarity of aqueous extract
- Non-volatile residue
- Comply with the
Systemic injection test and intracutaneous tests under plastic containers for parenteral preparations.
Eye irritation Test
Test animals: Healthy rabbits without visible eye irritation.
Extracting media: Sodium chloride injection or vegetable oil.
Procedure:
Use 3 albino rabbits for each extract to be examined. Gently pull the lower lid away from the eyeball to form a cup and instill about 100 microliters of sterile water for injection. Hold the lid together for about 30 seconds. Instill into the other eye 100 microliters of the sample extract prepared as directed under systemic injection test. Examine the eyes 24, 48, and 72 hours after installation. The requirements of the test are met if the sample extracts show no significant irritant response during the observation period over that with the blank extract. If the irritation is observed in the control eye treated with sterile water for injection, repeat the test using three additional rabbits.
Rubber Closures for Parenteral Product Containers
Rubber closures are generally used for vials and need to be thoroughly tested because they come into direct contact with the injectable preparations. Due to their complex composition, problems may be found with rubber stoppers such as absorbing of the active ingredient or excipients, and leaching of the rubber ingredients into the drug product. This may affect the safety of the product for its intended use. Therefore, a series of tests are performed to evaluate the quality of rubber closures. These include:
Identification – using IR spectroscopy.
Total ash – using compendial methods.
Other Tests:
Sample preparation (Solution A): Wash the closures in 0.2% w/v of anionic surface-active agents for 5 min. Rinse 5 times with distilled water and add 200 ml water and is subjected to autoclave at 119°C to 123°C for 20 to 30 minutes covering with aluminum foil. The cool and separate solution from closure to obtain Solution A.
Sterilization Test
When treated closures are subjected to sterilization test at 64°C to 66°C and a pressure of about 0.7 kPa for 24 hours, the closures must not soften or become tacky and there shall be no visual change in the closure.
Fragmentation Test
This is applicable to closures intended to be pierced by a hypodermic needle. For closures that are intended to be used for aqueous preparations, place a volume of water corresponding to the nominal volume – 4 ml in each of the 12 clean vials, close the vials with the prepared closures, secure with a cap and allow them to stand for 16 hours. For closures that are intended to be used for dry preparations, close 12 clean vials with the prepared closures. Using a lubricated long bevel hypodermic needle with an external diameter of 0.8 mm fitted to a clean syringe, inject 1 ml of water into the vial and remove 1 ml of air; carry out this operation 4 times for each closure, piercing each time at a different site. Use a new needle for each closure and check that the needle is not blunted during the test. Pass the liquid in the vials through a filter with a nominal pore size of 0.5 micrometers. Count the number of fragments visible to the naked eye. The total number of fragments is not more than 10 except in the case of butyl rubber closures where the total number of fragments is not more than 15.
Self-sealability Test
This is applicable to closures intended to be used with multidose containers. Fill 10 suitable vials with water to the nominal volume, close the vials with the prepared closures and secure them with a cap. For each closure, use a new hypodermic needle with an external diameter of 0.8 mm and pierce the closure 10 times, piercing each time at a different site. Immerse the vials upright in a 0.1% w/v solution of methylene blue and reduce the external pressure by 27 kPa for 10 minutes. Restore the atmospheric pressure and leave the vials immersed for 30 minutes. Rinse the outside of the vials. None of the vials contain any trace of colored solution.
The pH of Aqueous Extract
20 ml of solution A is mixed with 0.1 ml bromothymol blue and a small amount of 0.01 M sodium hydroxide is added to change the color from blue to yellow. The volume of sodium hydroxide required is not more than 0.3 ml and if it is done with 0.01 M hydrochloric acid, the volume of acid needed should be not more than 0.8 ml.
Reducing Substances
20 ml of solution A is mixed with 1 ml of 1 M sulphuric acid and 20 ml of 0.002 M potassium permanganate and boiled for 3 minutes, and cooled immediately. 1 g of potassium iodide is added and the solution is titrated against sodium thiosulphate using starch as an indicator. Blank is done and the difference between titration volumes is not more than 0.7 ml.
Residue on Evaporation
50 ml of solution A is evaporated to dryness at 105°C. The residue weight must be not more than 4 mg.
Tests for paper and Boards
Dimensions: The length, breadth, and height of the sample material are measured.
Thickness: This is measured using a micrometer; its value depends on the grammage and bulk density of the test material.
Grammage: A piece measuring 10cm x 10 cm is cut and weight is recorded. Grammage is calculated as:

the pH of Surface: Chemical residues can cause pH to become acidic. pH is tested by placing a drop of distilled water on top of the test piece and placing the electrode of the pH meter in the drop touching the paper. Reading is measured after 2 minutes.
the pH of Extract: 1 gram of paper is cut and placed in a 100 ml flask which is fitted with a condenser. 20 ml boiling distilled water is added little by little till the paper is wet. Then 50 ml of distilled water is added, and this is refluxed with occasional shaking at 95°C – 100°C for 1 hour. The mixture is cooled to 40°C to 45°C and the flask is detached from the condenser, shaken, and cooled in the water bath. The pH of the supernatant is determined using the pH meter.
Alkalinity: 5 grams of sample is weighed, cut into pieces, and placed in a stoppered flask with 250 ml of 0.02 N hydrochloric acids. After standing for 1 hour, the supernatant is decanted and a measured quantity (V) is titrated against 0.1 N sodium hydroxide with methyl orange indicator. A blank is also performed and alkalinity is calculated as:

where B = blank titre value, A = sample titre value, N = normality of sodium hydroxide, V = measured quantity used in titration and w = weight of paper taken
Moisture Content: Specimen weight is recorded and it is heated to a constant weight to remove moisture. The final weight is recorded and the difference between the two weights is the moisture content of the paper.
Ash Content: 1 gram of specimen is shredded and placed in a weighed crucible. The crucible is heated until the contents are completely charred. The crucible is transferred to a muffle furnace at 800° until carbonaceous material is burnt off. Then it is cooled in a desiccator, weighed and the experiment is repeated until a constant weight is obtained.

where C = initial weight of crucible, D = final weight of crucible.
Cobb Test: This test is a measurement of the mass of water absorbed by 1 cm2 of the test piece in a specified time when submerged under 1 cm of water. The result is quoted in grams/meter2
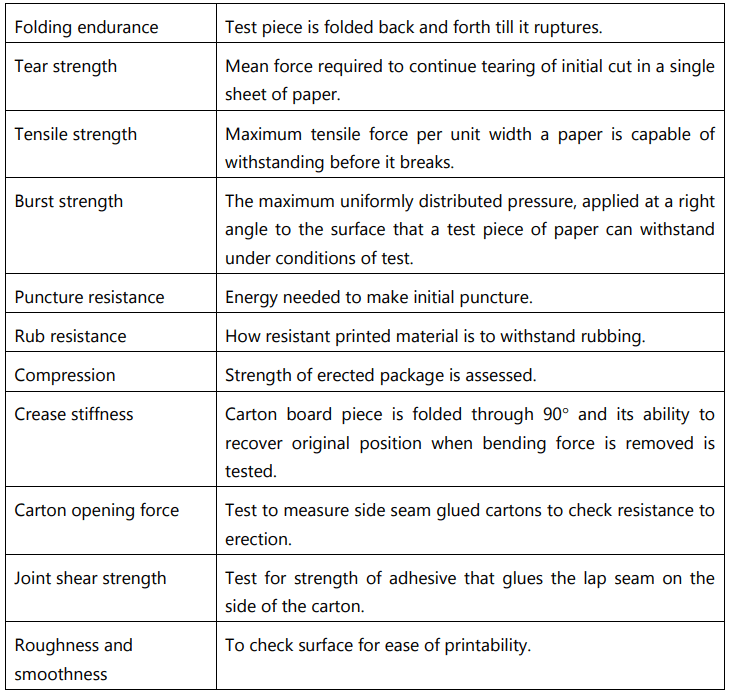
Other Tests for Paper/Board/Cartons
Some of the other important tests for paper/board/cartons are as described below:
Make sure you also check our other amazing Article on: Raw Material